


Video:
Use the Synchronization Controller to Control Two Electric Linear Actuators A
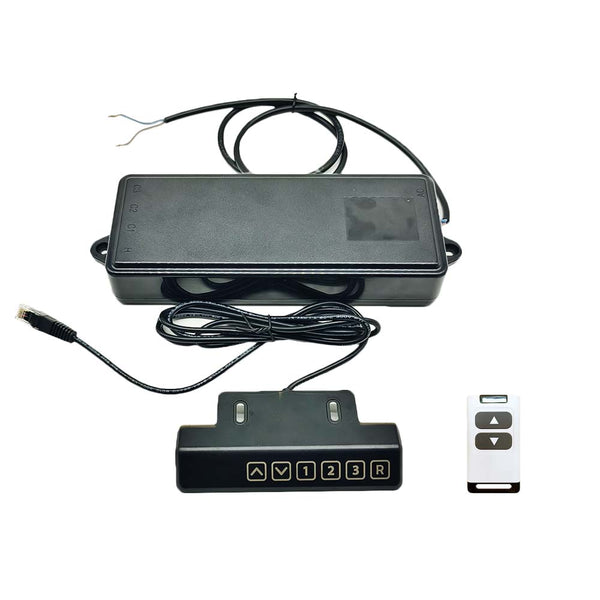
Package Include:
1 x Synchronous Controller (One-Control-Two, For 2 Linear Actuators A with Hall effect sensors)
1 x Touch Control Handle
1 x Remote Control
1 x User manual
Note: Two linear actuators A are not included, please order them separately.
Introduction:
If you want to use multiple linear actuators to raise and lower an equipment, for example two or four electric actuators. Since the high-speed DC motors in electric actuators cannot run at exactly the same speed, so the movement speed of the electric actuator will also be different. When multiple electric actuators work at the same time, their actual speeds cannot be exactly the same. In this case, we can use a synchronous controller to operate multiple linear actuators to rise or fall synchronously. They work completely in sync without any difference.
Working principle:
If you want to use a synchronous controller to operate 2 or 4 linear actuators fully synchronously, you will need to add built-in Hall effect sensors to each linear actuator. And when you purchased Hall effect sensor along with linear actuator, we will install Hall effect sensor to linear actuator for you.
When 2 or 4 linear actuators are running together, Hall sensor will send Hall signals to the synchronization controller, and the controller will adjust the running speed of each linear actuator, so that all linear actuators run at the exact same speed.
Feature:
It can operate two electric linear actuators A to run completely synchronously.
Wired control via a touch control handle or a manual switch (Model 0040025 optional).
Wireless control via a remote.
The LED display on the control handle will display the stroke position in real time.
Six touch function buttons: ▲, ▼, 1, 2, 3 and R.
Buttons ▲ and ▼ are used to operate the linear actuators extension and retraction.
Buttons 1, 2 and 3 are used to automatically operate the linear actuators to three pre-memorized positions.
Button R is the reset button and is used to reset the system in case of an error.
When linear actuators move close to the end position, they will automatically slow down to protect themselves.
When linear actuators are fully retracted, they will retain 1MM of travel to protect themselves.
Parameters:
Working Voltage: 10~30 VDC, suitable for 12V or 24V linear actuator
Number of connecting linear actuators: 2
Maximum output current: 10A / channel
Working Frequency: 433.92 MHz
Working Distance: 30m / 90ft (theoretically)
Case size: 240 x 95 x 43 mm (9.4 x 3.7 x 1.7 inches)
Operating Temperature: -20°C ~ +70°C
Connection:
1) Plug the touch control handle into the ports H of the controller.
2) Plug two linear actuators into the ports C2 and C3 of the controller.
3) Plug the manual switch into the ports C1 of the controller if you need to use an external manual switch.
4) Connect the positive pole of DC power supply to the brown wire of the controller and connect the negative pole of DC power supply to the blue wire of the controller.
CAUTION: Do not connect AC power directly to the controller!
Operation via the remote control:
1) Press the ▲ button of the remote control, two linear actuators extend outward at the same time; Press the button again, two linear actuators stop.
2) Press the ▼ button of the remote control, two linear actuators retract inward at the same time; Press the button again, two linear actuators stop.
Operation via the touch control handle:
Attention: The handle is operated by touch control. The touch sensitivity can be automatically calibrated when powered on for the first time. Hands are prohibited from touching the handle when powered on to prevent interference with the sensitivity calibration and affect the operating sensitivity.
1) Press and hold the ▲ button of the control handle, two linear actuators extend outward at the same time; Release the button, two linear actuators stop.
2) Press and hold the ▼ button of the control handle, two linear actuators retract inward at the same time; Release the button, two linear actuators stop.
3) Press any of the button 1, 2, or 3 on the control handle, two linear actuators will automatically move to the position memorized by that button and then automatically stop.
Note: You will need to first memorize three positions into these three buttons.
4) The LED display on the control handle will display the stroke position data in real time. For example, the number 03.5 means that the linear actuators have reached the stroke position of 35MM.
How to memorize three stroke positions:
1) The controller can memorize total three stroke positions, and each button memorizes one stroke position.
2) First operate two linear actuators to the first suitable stroke position that you need to store, then press and hold the button 1 of the control handle for about 3 seconds, the stroke value on the LED display will flash. This means that the current stroke position is already stored in button 1.
3) You can continue to store the other two stroke positions into the button 2 and 3 by following the operation above.
How to connect the manual switch:
You can connect an external manual switch (model 0040025) to this controller and then operate two linear actuators through it.
1) The manual switch has an UP button and a DOWN button, and each button has two normally open terminals 3 and 4.
2) Connect a four-conductor cable to the controller's manual switch port C1, and this cable has four wires: red, yellow, orange, and black wire.
3) Connect terminal 3 of two buttons to the orange wire, connect terminal 4 of the UP button to the red wire, and connect terminal 4 of the DOWN button to the yellow wire.
Operation via the manual switch:
1) Press the ▲ button of the manual switch, two linear actuators extend outward at the same time; Press the button again, two linear actuators stop.
2) Press the ▼ button of the manual switch, two linear actuators retract inward at the same time; Press the button again, two linear actuators stop.
Reset Function:
When the LED display on the control handle shows the fault code, you need to reset the system as follows.
Reset operation: Press and hold the <R> button of the control handle until all linear actuators are reset to the bottom, and the LED display on the control handle shows "00.1", then release the <R> button.
Use the Synchronization Controller to Control Two Electric Linear Actuators A
Package Include:
1 x Synchronous Controller (One-Control-Two, For 2 Linear Actuators A with Hall effect sensors)
1 x Touch Control Handle
1 x Remote Control
1 x User manual
Note: Two linear actuators A are not included, please order them separately.
Introduction:
If you want to use multiple linear actuators to raise and lower an equipment, for example two or four electric actuators. Since the high-speed DC motors in electric actuators cannot run at exactly the same speed, so the movement speed of the electric actuator will also be different. When multiple electric actuators work at the same time, their actual speeds cannot be exactly the same. In this case, we can use a synchronous controller to operate multiple linear actuators to rise or fall synchronously. They work completely in sync without any difference.
Working principle:
If you want to use a synchronous controller to operate 2 or 4 linear actuators fully synchronously, you will need to add built-in Hall effect sensors to each linear actuator. And when you purchased Hall effect sensor along with linear actuator, we will install Hall effect sensor to linear actuator for you.
When 2 or 4 linear actuators are running together, Hall sensor will send Hall signals to the synchronization controller, and the controller will adjust the running speed of each linear actuator, so that all linear actuators run at the exact same speed.
Feature:
It can operate two electric linear actuators A to run completely synchronously.
Wired control via a touch control handle or a manual switch (Model 0040025 optional).
Wireless control via a remote.
The LED display on the control handle will display the stroke position in real time.
Six touch function buttons: ▲, ▼, 1, 2, 3 and R.
Buttons ▲ and ▼ are used to operate the linear actuators extension and retraction.
Buttons 1, 2 and 3 are used to automatically operate the linear actuators to three pre-memorized positions.
Button R is the reset button and is used to reset the system in case of an error.
When linear actuators move close to the end position, they will automatically slow down to protect themselves.
When linear actuators are fully retracted, they will retain 1MM of travel to protect themselves.
Parameters:
Working Voltage: 10~30 VDC, suitable for 12V or 24V linear actuator
Number of connecting linear actuators: 2
Maximum output current: 10A / channel
Working Frequency: 433.92 MHz
Working Distance: 30m / 90ft (theoretically)
Case size: 240 x 95 x 43 mm (9.4 x 3.7 x 1.7 inches)
Operating Temperature: -20°C ~ +70°C
Connection:
1) Plug the touch control handle into the ports H of the controller.
2) Plug two linear actuators into the ports C2 and C3 of the controller.
3) Plug the manual switch into the ports C1 of the controller if you need to use an external manual switch.
4) Connect the positive pole of DC power supply to the brown wire of the controller and connect the negative pole of DC power supply to the blue wire of the controller.
CAUTION: Do not connect AC power directly to the controller!
Operation via the remote control:
1) Press the ▲ button of the remote control, two linear actuators extend outward at the same time; Press the button again, two linear actuators stop.
2) Press the ▼ button of the remote control, two linear actuators retract inward at the same time; Press the button again, two linear actuators stop.
Operation via the touch control handle:
Attention: The handle is operated by touch control. The touch sensitivity can be automatically calibrated when powered on for the first time. Hands are prohibited from touching the handle when powered on to prevent interference with the sensitivity calibration and affect the operating sensitivity.
1) Press and hold the ▲ button of the control handle, two linear actuators extend outward at the same time; Release the button, two linear actuators stop.
2) Press and hold the ▼ button of the control handle, two linear actuators retract inward at the same time; Release the button, two linear actuators stop.
3) Press any of the button 1, 2, or 3 on the control handle, two linear actuators will automatically move to the position memorized by that button and then automatically stop.
Note: You will need to first memorize three positions into these three buttons.
4) The LED display on the control handle will display the stroke position data in real time. For example, the number 03.5 means that the linear actuators have reached the stroke position of 35MM.
How to memorize three stroke positions:
1) The controller can memorize total three stroke positions, and each button memorizes one stroke position.
2) First operate two linear actuators to the first suitable stroke position that you need to store, then press and hold the button 1 of the control handle for about 3 seconds, the stroke value on the LED display will flash. This means that the current stroke position is already stored in button 1.
3) You can continue to store the other two stroke positions into the button 2 and 3 by following the operation above.
How to connect the manual switch:
You can connect an external manual switch (model 0040025) to this controller and then operate two linear actuators through it.
1) The manual switch has an UP button and a DOWN button, and each button has two normally open terminals 3 and 4.
2) Connect a four-conductor cable to the controller's manual switch port C1, and this cable has four wires: red, yellow, orange, and black wire.
3) Connect terminal 3 of two buttons to the orange wire, connect terminal 4 of the UP button to the red wire, and connect terminal 4 of the DOWN button to the yellow wire.
Operation via the manual switch:
1) Press the ▲ button of the manual switch, two linear actuators extend outward at the same time; Press the button again, two linear actuators stop.
2) Press the ▼ button of the manual switch, two linear actuators retract inward at the same time; Press the button again, two linear actuators stop.
Reset Function:
When the LED display on the control handle shows the fault code, you need to reset the system as follows.
Reset operation: Press and hold the <R> button of the control handle until all linear actuators are reset to the bottom, and the LED display on the control handle shows "00.1", then release the <R> button.